http://download.bitdefender.com/am/cw/BDAntiRansomwareSetup.exe
Category: สู่เส้นทางดิจิตอล
If you are looking for ransomware decrypt tools to unlock files locked by ransomware on your Windows computer, then this list is what you are looking for. Ransomware threats are on the rise, and every other day we get to read about it – whether it is Petya or Locky. This class of malware seems to be he favorite now as it is very profitable – lock down users files and data and the demand money to unlock them.
While there are some basic steps one can take to prevent ransomware, it can still happen that you end up being a victim of some ransomware.
Well what does one do if that happens?
1.Install Autodesk Autocad Architecture 2017
2.Use as Serial 666-69696969, 667-98989898, 400-45454545 066-66666666 .. or anything matching those templates
3.Use as Product Key 185I1
4.Finish the installation & restart Autodesk Product
Choose Enter a Serial
regsvr32 “C:\Program Files\SAS\SharedFiles(32)\EnhancedEditor\editorcontrol.ocx”
บทความนี้ขอแสดงขั้นตอน พร้อมตัวอย่างการคอนฟิกใน SQL Server 2008 R2 เพื่อเปิดพอร์ต TCP 1433 และการคอนฟิกอนุญาตใน Windows Firewall เพื่อให้เครื่องอื่นๆ ไม่ว่าจะรัน Windows, Linux, UNIX สามารถเชื่อมต่อเข้ามาได้ โดยจะทดสอบบน Windows 7 Service Pack 1 (64-bit)
ในเมนู Microsoft SQL Server 2008 R2 ภายใต้ Configuration Tools คลิ้กที่ SQL Server Configuration Manager
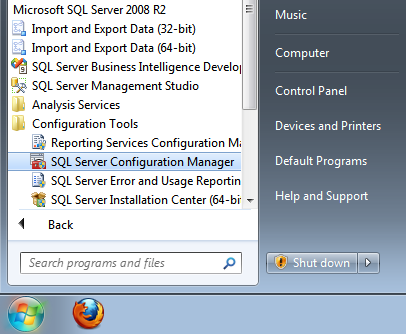
ใน SQL Server Configuration Manager ภายใต้ SQL Server Network Configuration คลิ้กที่ Protocols for MSSQLSERVER จะมีรายชื่อโปรโตคอลพร้อมสถานะแสดงอยู่ด้านขวา
MS SQL Server 2005 remote access configuration is different from MS SQL Server 2000. Remote access to MS SQL Server 2005 with user and password is required and necessary for any database applications. If MS SQL Server 2005 is originally configured for windows authentication, configuration for remote access ( mixed mode or SQL Server authentication ) needs a little more extra work to get it done.
Here is how to get this done.
- Configuration in SQL Server Management Studio
Name: KARAN PC
Serial: AXOQM-RDMFS-ZMNOU-QTIBC
———————–
Serial: AXMQU-RFMKG-LJJAZ-JMXHF
———————–
Serial: AXNQH-RSMOQ-RIJJQ-YQXHE
———————–
Serial: AXOQV-RYMDN-XLEHP-AEGEJ
———————–
Serial: AXZQT-RGMUD-LINUP-ZTEGJ
———————–
Serial: AXWQB-RJMTA-INEJV-TKTEI
———————–
Serial: AXVQU-RKMFG-RBPSY-AMEMC
———————–
Serial: AXSQU-RUMAT-FZJEF-XLCZA
———————–
Serial: AXBQW-RXMYU-KYEXL-MOVSJ
———————–
Serial: AXMQU-RFMKG-LJJAZ-JMXHF
1. Enter as Administrator
2. Control Alt Delete
3. Choose Task Manager
4. File and Run New type msconfig
5. Select Start Up Check Safe Mode
6. Click OK and allow your machine to re-boot.
7. I sign in as Administrator at this point. You will find that the problem is no longer there in safe mode.
8. Select Command Prompt
9. Type sfc /scannow
10. The scan will probably return “No files affected” or something that states all was in order. Sorry, I did not write it down.
11. Type in msconfig again
12. Select Start Up and Uncheck the Safe Mode box and Hit OK
13. All back to normal.
Malwarebytes Anti-Malware Premium 2016 LifeTime Key:
ID : 3AM65
Key : GGKN-XQD4-EH3N-0E4H
Malwarebytes Anti-Malware Premium 2016 Key Cracked Free Download:
To get to the Menu on Google Chrome browser, click on the “Wrench” icon on the top right-hand corner. From here you can access certain browser features.
However, there are several features that are not available from the Menu, which you can access only using the chrome:// commands. Some of the features are available under both Menu and chrome:// commands.
Following are the 12 most helpful chrome:// commands that you should know.