ใครเจอ IDMGgrhlp.exe รัน cpu อยู่ตลอด ให้แก้ตามนี้
1. ปิด IDMGrHlp.exe ทุกตัวใน Task Manager จากนั้นปิดโปรแกรม IDM
2. ลบ IDMGrHlp.exe
3. เปลี่ยนชื่อ idmBroker.exe เป็น IDMGrHlp.exe
4. เปิดโปรแกรม IDM เพื่อใช้งานตามปกติ
ใครเจอ IDMGgrhlp.exe รัน cpu อยู่ตลอด ให้แก้ตามนี้
1. ปิด IDMGrHlp.exe ทุกตัวใน Task Manager จากนั้นปิดโปรแกรม IDM
2. ลบ IDMGrHlp.exe
3. เปลี่ยนชื่อ idmBroker.exe เป็น IDMGrHlp.exe
4. เปิดโปรแกรม IDM เพื่อใช้งานตามปกติ
 ทุกท่านเคยประสบปัญหาข้อมูลรายชื่อเพื่อนใน LINE หาย บนมือถือเครื่องใหม่ เพราะรู้เท่าไม่ถึงการณ์ โดยนำซิมการ์ดไปใส่บนอีกระบบปฏิบัติการ (จาก iOS ไปใส่บนเครื่อง เช่น android หรือ Windows Phone 8) จากนั้นล็อกอินด้วยอีเมล์เดียวกับที่ลงทะเบียนไว้บน iOS ปรากฏว่าข้อมูลบน LINE for iOS เครื่องเดิมถูกลบทิ้งหายหมด) ข้อควรรู้คือ หากเราย้าย LINE ข้ามระบบปฏิบัติการหรือเปลี่ยนเครื่องใหม่ บางคุณสมบัติอาจใช้งานได้ แต่ในบางคุณสมบัติอาจใช้งานไม่ได้ และหากเปลี่ยนเครื่อง เปลี่ยนระบบปฏิบัติการ ผู้ใช้จำเป็นต้องทราบถึงข้อจำกัดว่า หากใช้ LINE บน ระบบปฏิบัติการอื่น ที่ไม่ใช่ ios หรือ android บางส่วนจะไม่สามารถซื้อสติกเกอร์และเล่นเกม line ได้
ขั้นตอนการติดตั้ง
1. ดับเบิลคลิกที่ไฟล์ Arcade.part01 (.exe)
2. เลือกโฟลเดอร์ปลายทางที่จะติดตั้ง (ค่าเริ่มต้นอยู่ที่ C:\) แล้วคลิกที่ปุ่ม Install
3. รอจนกว่าการ Extract ไฟล์จะเสร็จสิ้น (ประมาณ 20 นาที)
4. หลังจากที่ติดตั้งเสร็จจะปรากฏกรอบโต้ตอบ Registry Editor ให้คลิกที่ปุ่ม Yes แล้วคลิกที่ปุ่ม OK
5. ดับเบิลคลิกที่ไอคอน Arcade บน Desktop
6. ใส่รหัสผ่านลงทะเบียน: 301220301220301220
ถ้ารหัสไม่ยอมผ่านให้ ให้เปลี่ยนวันที่ในคอมเป็น วันที่ 11 เดือน 11 ปี 2555
You may start IDM from the command line using the following parameters
idman /s
or idman /d URL [/p local_path] [/f local_file_name] [/q] [/h][/n] [/a]
/d URL – downloads a file
e.g. IDMan.exe /d “http://www.internetdownloadmanager.com/path/FileName.zip”
/s – starts queue in scheduler
/p local_path – defines the local path where to save the file
/f local_file_name – defines the local file name to save the file
/q – IDM will exit after the successful downloading. This parameter works only for the first copy
/h – IDM will hang up your connection after the successful downloading
/n – turns on the silent mode when IDM doesn’t ask any questions
/a – add a file specified with /d to download queue, but don’t start downloading
Parameters /a, /h, /n, /q, /f local_file_name, /p local_path work only if you specified the file to download with /d URL
Examples
C:\>idman.exe /n /d http://www.tonec.com/download/idman317.exe
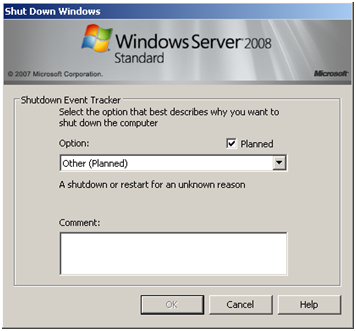
A nice feature that can sometimes by annoying is the Shutdown Event Tracker, that allows you to comment every time you shut off a server. While I do understand the auditing requirements to have this in place on production server, this feature is unnecessary for development and test servers and can be disabled.
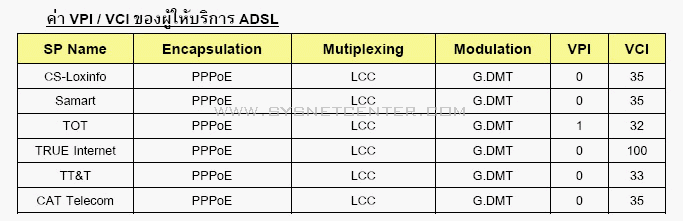
3BB VPI 0 VCI 33 PPPoE LLC
We all use removable disks in Windows. Well, sometimes, you may came across such errors with these removable disks, that may make you believe that the disk has malfunctioned and can’t be used at all. Today, in this article, we’ll discuss on such scenario I recently faced with a USB Drive. Actually, whenever I plug that drive and perform any operation with this drive results in following error:
Fences’ settings are stored in the registry key “HKEY_CURRENT_USER\Software\Stardock\Fences”
Also, snapshots are stored in the folder “%appdata%\Stardock\Fences”