1.login เป็น admin ก่อน
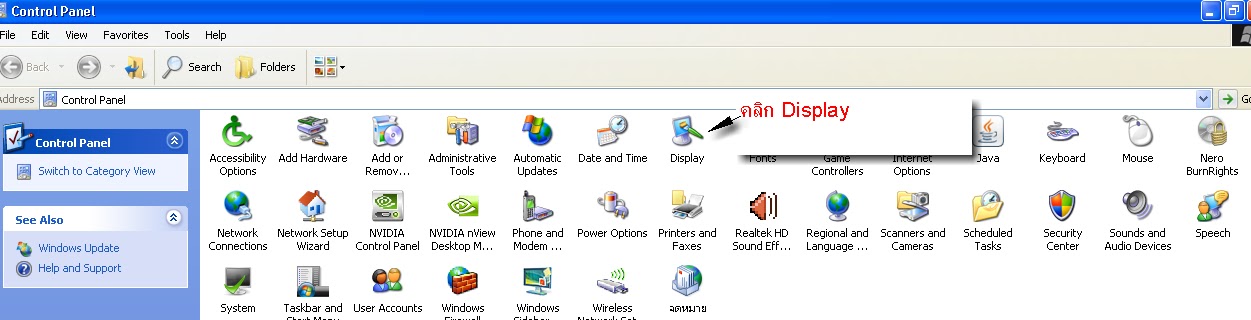
Control PanelAll Control Panel ItemsAdministrative Tools
Computer Management >Local Users and Groups >Users
ด้านขวา คลิกขวาที่ Administrator >Properties >ติ๊กถูกที่ Account is disable ออก >ok
2.logout ออกแล้ว login เข้าเป็น admin
3.ใส่แผ่น / Mount Image แล้วแต่จะเลือก
4.มีหน้าต่างเด้งมา ลง ArcGIS License Manager >yesๆ >okๆ แล้วก็ Finish
5.จะมีหน้าต่าง ArcGIS License Server Administrator – 10.0 เด้งมา >กดปิดออกไปก่อน
6.ไปที่ไฟล์ ArcGIS 10 Crack.rar แตกมาวางไว้ วางไว้ไหนก่อนก็ได้ desktop ก็ดี จำง่ายดี
7.ในโฟลเดอร์ overwrites แก้ไฟล์ 9.xLic.lic
8.คลิกขวา open with notepad
9.copy ชื่อของเครื่องเรา เช่น Jopang-PC มาแทนที่ your_host_name กด save แล้วออก
10.ในโฟลเดอร์ overwrites ก๊อบปี้มาให้หมด
11.วางทับลงไปที่ C:Program FilesArcGISLicense10.0binตรงนี้แหละ วางทับเลย
โดย copy and replace ทั้งหมด
แต่ช้าก่อน มันจะขึ้นว่า Folder In Use กด Try Again ก็ไม่ผ่าน >กด Task Manager ขึ้นมา หรือ Ctrl+Alt+Delete
12.ไปที่แถบ Services จะมี ArcGIS License Manager กำลัง Running กดคลิกขวาเลือก Stop service
ทีนีก็กด Try Again ได้แล้ว ไฟล์ที่ก็อบปี้มาก็จะวางทับได้ >วางทับเสร็จ กลับไปคลิกขวาเพื่อ Start service ให้เหมือนเดิม
13.ไปที่ C:Program FilesArcGISLicense10.0bin
14.เปิด lmtools.exe ขึ้นมา
15.ไปที่แถบ Config server จะเจอ Browse อยู่ 3 อัน
Browse หาตามนี้เลยนะครับ
Browse แรก ไปที่ Program FilesArcGISLicense10.0binlmgrd.exe
Browse สอง ไปที่ Program FilesArcGISLicense10.0bin9.xLic.lic
Browse สาม ไปที่ Program FilesArcGISLicense10.0binlmgrd9.log
กด Save Service
16.ไปที่แถบ Start/Stop/Reread
กด Stop server ก่อน
กด Reread Licence File
กด Start server จะขึ้น Server Start Successfull ถ้าไม่ logon เป็น Admin จะไม่ขึ้นแบบนี้
17.ไปที่แถบ Server Diags
กด perform diagnostics
จะขึ้นว่า This Licence can be checked out
กดปิด ออก
ได้ลงซะที
18.ใส่แผ่น / Mount Image แล้วแต่จะเลือก
19.มีหน้าต่างเด้งมา ลง Arcgis Desktop กด Setup
Next >I Accept >Complete >Next แล้วก็กด Finish
20.จะมีหน้าต่าง Arcgis Administrator Wizard เด้งมา
เอา ArcInfo ใหญ่สุดใช้หลายคน คนเดียว แล้วแต่จะเลือก >ok
21.ไปในโฟลเดอร์ Crack
copy ไฟล์ AfCore.dll กับ float.reg
22.ไปวางไว้ที่ C:Program FilesArcGISDesktop10.0Binตรงนี้แหละ วางทับเลย copy and replace
23.ไปที่ไฟล์ float.reg คลิดขวา กด Merge >yesๆ >okๆ
24.ไปที่ Start >All Program >ArcGIS Administrator
25.หัวข้อ Desktop >เอา ArcInfo ใหญ่สุดใช้หลายคน คนเดียว แล้วแต่จะเลือก >ok
แล้วก็เป็นอันเสร็จภารกิจลง ArcGIS 10.0 ครับพี่น้อง
 Note for Vmware/ VirtualBox installation (ignore if installing Natively): Change your virtual disk type to be IDE because the default type in VMware is SCSI, and Android-x86 kernel is not configured to support SCSI. Here’s how to create new VM in VMWare: