Update ใหม่ครับ
อย่าลืม uninstall driver ตัวเดิมออกก่อนนะครับ
ผมแก้ nvac.inf แล้ว โหลดได้ที่นี่ครับ
http://www.4shared.com/file/nz2TA48c/nvac.html
ผมใช้ Win7 Ultimate 32bit
โหลด driver Nvidia 97.16 ตัวใหม่ จาก http://www.nvidia.com/Download/index5.aspx?lang=en-us
เลือกรุ่น GT330M สำหรับ Notebook นะครับ ของผมเลือก win7 32 bit
จะได้ไฟล์ 197.16_notebook_winvista_win7_32bit_international_whqส .exe มาครับ
จากนั้นให้แตกไฟล์ออกก่อน โดยWinrar
เอาไฟลล์ nvac.inf ที่โหลดมาไปวางทับตัวเดิมในโฟล์เดอร์ Driver ใหม่ที่เราเพิ่งแตกไฟล์ออก รัน setup ได้เลยครับ
มันจะถามอะไรขึ้นมา ให้กด install ไปเลยครับ
ลงได้ครบถ้วนทุกอย่างครับ driver, Nvidia hd audio, physx
เทสต์แล้ว ปรับได้ทุกอย่างครับ
++++++++++++++++++++++++++++++++++++++++++++++++++++++++++++++++++++++++++++++++
อันเนื่องมาจากคลับ Sumsung เขาลงได้แล้ว
และมีวิธีใน NBS แต่เราดันโหลดไฟล์ไม่ได้ ก็เลยมั่วๆ ดูครับ ใครได้วิธีลงก็บอกด้วยครับ
จะเป็นพระคุณอย่างยิ่ง
ผมใช้ Win7 Ultimate 32bit
ได้วิธีอย่างนี้ครับ
โหลด driver Nvidia จาก http://www.nvidia.com/Download/index5.aspx?lang=en-us
เลือกรุ่น GT330M สำหรับ Notebook นะครับ ของผมเลือก win7 32 bit
จะได้ไฟล์ 197.16_notebook_winvista_win7_32bit_international_whqส .exe มาครับ
จากนั้นให้แตกไฟล์ออกก่อน โดยWinrar
แล้วให้ไป copy file ชื่อ nvac.inf จากแผ่น driver ของ Acer ที่ให้มากับเครื่อง
ซึ่งมันอยู่ใน CD-Rom:WIN7X86VGANVIDIADISPLAY (ผมใช้ Win7 32 bit)
เอาไฟลล์ nvac.inf ไปวางทับในโฟล์เดอร์ Driver ใหม่ที่เราเพิ่งแตกไฟล์ออก
แล้วรัน setup.exe ดูครับ มันจะให้เราลบdriver เดิมออกก่อน แล้ว reboot จากนั้นก็จะลงตัวใหม่ให้
มันจะถามว่า driver ไม่ได้รับรอง ให้เรากดเลือก installไปเลยครับ เป็นอันว่าลง driver เสร็จครับ
ลองตรวจสอบดู ถ้า HDMI Audio กับ Physix ตัวไหนไม่ได้ลง ก็ให้ลงเอง manual ต่างหากก็ได้ครับ
Category: สู่เส้นทางดิจิตอล
Syndrome: The Ubuntu 10.04 laking F4–save graphic mode, thus when booting from live-CD, no GUI appears (but the control+alter+F3 works to switch to terminal mode)
Computer: ASUS K50IN with nVidia G102M
My solution:
1. Download alternate CD and install it into laptop (comparing to normal CD, it took longer to install, I did not know why!!).
2. After installating and rebooting (now GUI), switch to terminal mode (e.g. control + alter + F4)
3. Install drivers: sudo apt-get install nvidia-185* and then I can can the screen at 800*600 (low resolution)
note: when I used 9.10, I found the proprietary driver is nvidia-185, that’s why I suggestion this.
4. Install one more driver: sudo apt-get install nvidia-glx-185 and then the screen should be at correct resolution.
I am not an advanced user of ubuntu, but the above way did work to solve this trouble. If you cannot solve it, my not-smart suggestion is: sudo apt-get install nvidia-* (to install all nvidia drivers)
As some bug reports, the xserver-xorg-video-nouveau did not work for this laptop. Some other suggestions from webs, like to install nvidia driver 190.42. Actually, I could not find this version of driver even I followed the instructions to add PPA to source list.
เพิ่มเติม- ใช้ Ubuntu 9.10 สามารถใช้ใน VGA Mode ปกติได้
คำสั่ง เช็ควัน
cscript "%PROGRAMFILES%Microsoft OfficeOffice14ospp.vbs" /dstatus
ถ้าไม่ขึ้น Day ก็แสดงว่า Activated แบบ สมบูรณ์
Step 1
Connect USB Pen Drive (512MB or more)
Step 2
Download and Run USB Disk Storage Format ![]() usb_format.zip (34KB)
usb_format.zip (34KB)

1) ลง program ตามปกติ
2) copy keygen.exe ไปไว้ที่ใดที่หนึ่ง
3) double click
4) ใส่หมายเลข module ที่ต้องการจะลง
5) รอสักครู่
ุ6) จะมีไฟล์ .lic มาจากไหนไม่รู้มาอยู่ใน folder เดียวกันกับ keygen.exe
7) ไปที่ start/program/national instruments/NI License Manager
8) ใน tree ด้านซ้าย ให้ highlight ไปที่ module เหมือนกับอันที่เรา generate ไว้ด้วย keygen.exe
9) ยังไม่ต้องไปไหน เลือกที่ option/Install License File แล้วเลือก .lic ที่เราทำไว้แต่แรก
10) เมื่อกด ok.แล้ว module ที่เราเลือกจะเป็นสีเขียวครับ
11) module ที่เหลือก็ทำเหมือนกัน ถ้าตองการ จริงๆแล้วใช้แค่ professional ก็ใช้งานได้แล้วครับ
Hi just thought i’d share this as it fixed my printer (RX510) after getting problems
I found this info about reseting the RX510.
*Turn the printer off.
*Press and HOLD all the following buttons: Power, Load/Eject, Stop, B&W, Color.
*RELEASE BUTTONS when you see “Init eeprom” on printer screen. Press Colour
button to clear protection counter.
This will clear the message about parts in your printer reaching the end of their useful service life (you should also wash out the ink pads in your printer when you do this)
Hope this helps.
Found this hope it explains a bit more
what you’re experiencing is what Windows refers to as “setting the dirty bit” and what you have to do is unset that bit. Every time Windows XP starts, autochk.exe is called by the kernel to scan all volumes to check if the volume dirty bit is set. If the dirty bit is set, autochk performs an immediate chkdsk /f on that volume. Chkdsk /f verifies file system integrity and attempts to fix any problems with the volume. It is usually caused by a hard shut down or a power loss during a read-right operation on that particular drive.
How do I fix it, you ask?
Well, that’s easy. First click Start> Run> bring up a command prompt by typing in “CMD” and type ” fsutil dirty query d: “. This queries the drive, and more than likely it will tell you that it is dirty. Next, type “CHKNTFS /X D:”. The X tells Windows to NOT check that particular drive on the next reboot. At this time, manually reboot your computer, it should not do a Chkdsk and take you directly to Windows.
Once Windows has fully loaded, bring up another CMD prompt and type and now you want to do a Chkdsk manually by typing “Chkdsk /f /r d:”. This should take you through 5 stages of the scan and will unset that dirty bit. Finally, type “fsutil dirty query d:” and Windows will confirm that the dirty bit is not set on that drive. Good luck!
Windows 7 has best look and feel as compared to windows vista. One thing which I really liked about windows 7 is possibility of personalizing and customizing windows 7 with our own custom themes. Well don’t guess that creating custom windows 7 themes is geeky task but its far simple then previous windows operating system.
Microsoft has introduced style and desktop slide shows in windows 7, which are enough to help us in customizing windows 7. In windows 7, styles are called as Themes and Windows 7 Themes/ Styles are a formal combination of desktop background, Aero glass window color, sound scheme, and screen saver.
Windows 7 has several default themes and some of them are hidden themes which you can unlock. You can also download windows 7 Themes from Microsoft windows 7 website. Incase you want to create your own create Windows 7 themes then here is small guide on how to create Windows 7 Themes.
ใช้กับ Acer XX30, SONY VGN-NS110E,CS204J
The AD-7560S is a slim internal type with 12.7mm height and an IDE/ATAPI/SATA interface DVD R/RW/RAM recordable drive. The drive is able to write DVD+/-R/RW/RAM discs as well CD- R/RW discs and can perform as a regular DVD-ROM drive. The AD-7560S has 8X speed DVD+R disc writing, 8X speed DVD+RW disc writing, 6X speed DVD+R DL (Dual Layer) disc writing, 8X speed DVD-R disc writing, 6X speed DVD-RW disc writing, 6X speed DVD-R DL (Dual Layer) disc writing, 5X DVD-RAM disc writing, 8X speed DVD-ROM disc reading, 24X speed CD-R disc writing, 24X speed CD-RW disc writing and 24X speed CD-ROM disc reading capabilities. Furthermore, the AD-7560S supports all writing methods specified in industry standards and the functions of writing conform to them.
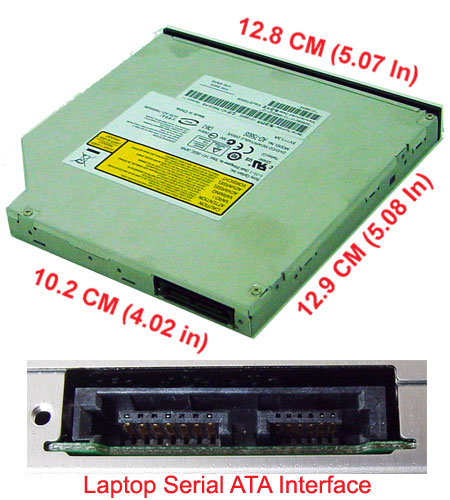 Specifications
- Transfer Rate read: DVD: 8x max. CD: 24x max
- Transfer Rate write: DVD-R: 8x max. DVD +R: 8x max. DVD-RW: 6x max. DVD +RW: 8x max. DVD-R DL: 4x max. DVD +R9: 4x max. CD-R: 24x max. CD-RW: 24x max
- Access time: DVD: 180 ms CD: 150 ms
- Mechanism: Tray load mechanism
- Interface: SATA
- Burst transfer rate: PIO mode 4 / Ultra DMA 33
- Media supported: DVD-ROM, DVD-R, DVD-R DL, DVD-RW, DVD +R, DVD +RW, DVD +R9, CD-ROM, CD-R, CD-RW
- Modes supported: DVD-Video, CD-ROM XA, CD-Audio, CD Extra, CD Text, CD-I Ready, CD-Bridge, PhotoCD, Video CD, Hybrid CD
- Writing methods: DAO, SAO, TAO with zero gap, variable or fixed packet, multisession
- Compatibility: MPC Level 3, MultiRead, PC2001
- Weight: 0.18 kg
- Dimensions: 128 mm x 12.7 mm x 129 mm
- Special features: 12 cm and 8 cm CD and DVD media are supported, buffer under run error prevention
Google FreeDNS : 8.8.8.8 , 8.8.4.4
OpenDNS: 208.67.222.222 , 208.67.220.220